Hello everyone!
I am here today to share my projects with you, which I am submitting as my Final Project for Altenew's Educator Certification Program (AECP) Level 2. For this submission I was assigned to make 4 Masculine cards with Themes; birthday, Love/Thinking of You, Anniversary, and Encouragement + Altered Item/Upcycled Project. It is going to be a long post and hopefully you will enjoy going through it!
Here's a quick look at all my projects. I also have a You tube Tutorial with detailed explanation.

Masculine cards are somewhat tricky, especially, when the products in my stash - are not Sports/Food/ Outdoors . And also, being a lover of flowers, I am thinking in my head - why can't we have Masculine floral cards? So while planning my projects - I tried to incorporate flowers too.
All my cards and the Altered item - are based on this beautiful color palette! In one of my recent interactions with some cardmakers, I found out that Teal was a very loved color. And nothing says - Men, more than Blue, hence the palette. I used some Artistic freedom for the color Ochre here, and substituted it with Gold and Browns for my projects.

For the techniques of my projects - I have incorporated the lessons from -
These two classes and the Class - Polychromatic -shares the tips about the ratio of colors and the way Color wheel can help us decide colors - made me appreciate color wheel in a much better way. I actually went Therese's way to choose my Color Palette, by using analogous colors.
From choosing the right paper to using dye inks and reinkers for adding colors to the card. Also she shares - how blending is about layering and overlapping and being careful about the colors we choose, so it doesn't get muddy.
Let it Shine by Carissa Wiley Classes.
These classes give you numerous ways to incorporate an element of shine or sparkle to a card. The idea is to enhance and lift your card design to another level with the thoughtful addition of some shine aspect. I have incorporated heat embossing, metallic cardstock and paints to add shine to my projects.
Tips for planning to make similar cards -
1. When you have to make a set of cards - plan ahead. There have to be things that bind them together to call it a set. You could have a common stamp/die or stencil for all the cards, I chose to have a common color palette.
2. If you decide to choose a color palette, go through your stash of cardstocks, inks, colors, other mediums that you may use, embellishments etc, and see what are the colors you have and then plan a color scheme. This is also the perfect time to bring in the Color Wheel, to plan if you want Complimentary or analogous or Triadic colors for your projects. Also, I consider, Black, White and Grey - neutrals - so using them doesn't have to be in the color scheme.
3. Get the right cardstock, for the right technique. Using Watercolors on Neenah cardstock may turn into disaster, please choose the correct cardstock.
4. The most crisp Heat embossing comes, when you let the inks on the cardstock, dry for a night. Even after using a heat tool the inks may be wet, especially if using distress oxides. Also, after ascertaining that the surface of ink blended background is completely dry, don't forget to use Antistatic tool, before stamping with Versamark. Take off strays of embossing powder with a brush or a pointy tool.
5. In case the stamping of Heat embossed sentiment or image is not proper, go ahead and use a pen of similar color to fill it up.
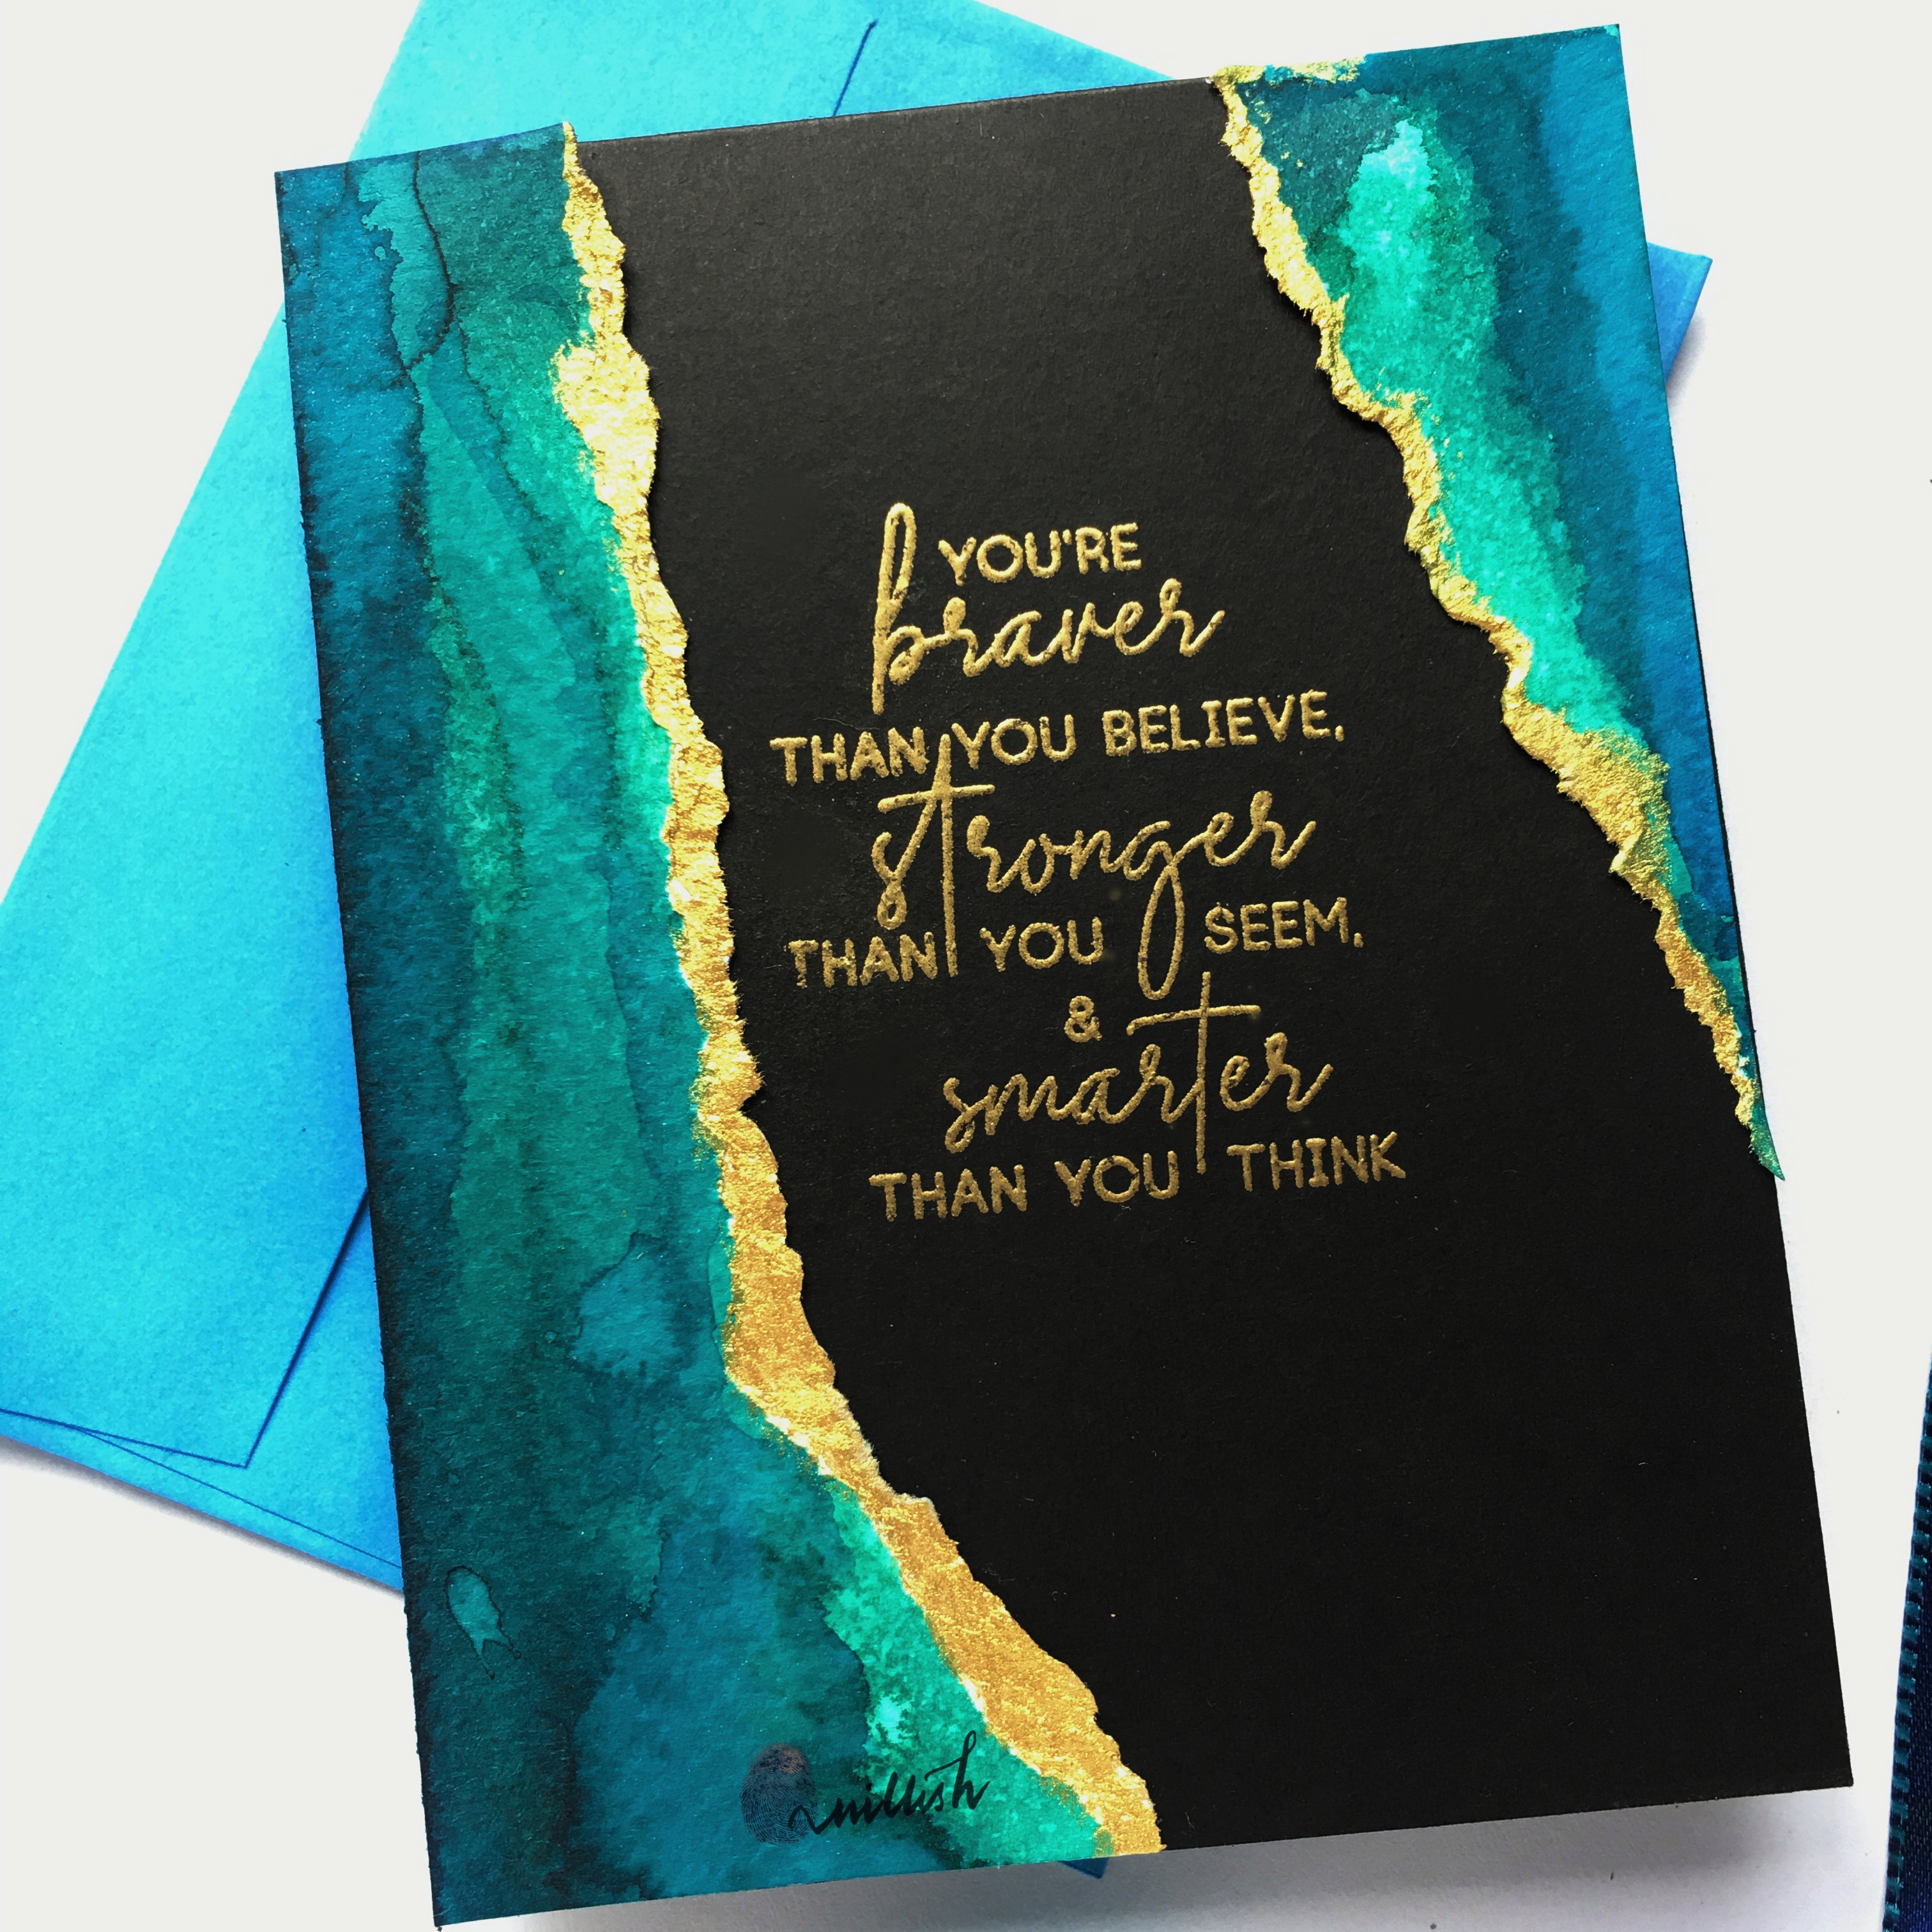
Encouragement Card
For this card I went a step ahead of faux water coloring taught by Amy and made my own pattern paper that would frame a beautiful quote, perfect for an encouragement card. This card also may remind you of the CAS boutique cards - my heart knows, how much I have learnt "constraint" in that class and on this card.
I created a panel using reinkers and watercolors and then just went ahead and tore it in a way to get the white edge, which I then painted with gold acrylic paint. The sentiment was heat embossed with Gold embossing powder.. and tadddaaaa.
Products used - Seasonal Blooms CYL kit

Love You Card
The ink blending of analogous colors on a light blue cardstock creates a glow. The class by Amy, teaches how you can build layers up and I was aiming to get a magical look for a Fairy tale - love card, which I think I was able to achieve. The stamping of the trees for a tone on tone background, adds to the magic. I added my shine with Gold embossing the Carriage and White heat embossing a lovely sentiment.
Products used - Once Upon a time stamp set


Anniversary Card
Here's where I bring my flowers - for an Anniversary card and the layering stamps of Vintage Roses gave me a great opportunity to Add my shine, using Gold embossing on the fourth layer and use the lessons of Masking Unleashed, for almost a One layer card. I chose the blues and teals for stamping the flowers and browns for the leaves. One of the flowers was cut and added on to the layered flowers for added dimension.
Products used - Vintage Roses stamp set


Birthday Card
For this card I added a lot of textures and tried a technique I have been wanting to try - Double dry embossing. I added color and texture on the card panel, first with Organic Linen embossing folder, then I added More color with the Frame of leaves embossing folder. With the background ready, I started working with the beautiful Wood Cookie die. I blended browns on the beige colored cardstock for a natural feel. Die cut a ladybug and added a gold under wing for it, to add some Shine. I also added flowers and leaves from Painted Blooms die set and Lovely envelope die.


Altered Book Cover
I must admit, this was way out of my comfort zone - BUT, I have been waiting to shed my inhibitions and try a big Mixed media project (bigger than a card,lol) and this was the perfect opportunity, to dress up a notebook in which I have some cherished memories, my son's writing as a toddler, my father's scribbles of some financial planning and lots of my own Astrology notes.

Because it was more of a trial and what if it didn't look as good as it was looking in my head?? So I didn't record a video of it, but I have pictures to share, that explain the steps. I have been inspired my various mixed media artists and I attempted things - intuitively, rather than going through -
1. I started with covering my notebook with two coats of Chalk paint that I had been hoarding and luckily had not dried :P
2. Once dried, I added some texture paste over the cover with Beveled squares stencil for a lovely pattern on the cover, which I purposely didn't get very even.

3. After the texture paste dried, I added Black Chalk paint, some gouache in the teals and blues, Distress oxide sprays and some metallic pastes to add some glisten to the raised stenciled areas.
4. This color scheme and a project like this need more texture and color and was a perfect time to get my beloved Delicate Dragonfly. I diecut it with cardboard, adhered the layers together - added some gouache and sparkle dust on the wings.
4. I took an old die (New day card kit Frame die) that resembles a mirror frame, die cut it with cardboard and adhered all the layers. Then colored it in black and added some metallic pastes.

5. I also diecut I from Classic Alphabet dies with cardboard and mirror cardstock and adhered all the layers.
6. Before I adhered all my elements, I took a glossy varnish and applied a layer on all the texture cover.
Then with strong glue I adhered all my elements and added some dew drops for added interest.


It is time to submit my projects, I am very pleased with them. It is like when you give your exam and feel, you gave your best shot, now it is for the examiner to decide 🤞

Hope you all who stop by my blog like my set of cards and the MM book cover, if you did, please leave me a comment below and also about where you are from. Also you can watch the You Tube Tutorial for the same here or
Thank you for stopping by
Lots of love ~ Ishani
Just in case you would want to do a little shopping I’ve added the links in the post (some of them are affiliate links which means that I will receive a small portion of the sale at no extra cost to you). I am grateful and truly appreciate your support. 274
Your cards are just fabulous Ishani. The beautiful sentiment just pops with the way you layerd the cardstock next to it. Your mixed media project is just stunning. Well done.
ReplyDeleteYou are very kind to think so Anet, thank you so much for stopping by ❤️
DeleteThis entire ensemble is beyond gorgeous! I love everything you created. Totally amazeballs! This post is going on the AECP featured posts for sure! Bravo, Ishani! Well done!
ReplyDeleteOmg ...I am thrilled that you liked it, thank you soo much Erum 😊 I am blushing and so happy that you thought they are good enough to be featured. So very thankful 🙏
DeleteBeautiful cards, Ishani. I am obsessed with the encouragement card. You really put your heart and soul into creating cards for the AECP.
ReplyDelete